
Introduction: One of our most popular and successful Fyrd courses is our Land Navigation course. In an age of GPS and Turn-By-Turn navigation software, the skill of finding one’s own way the “old fashioned” way is beginning to fall into disuse. While we can think of a number of scenarios where this information might come in handy for hiking or cycling enthusiasts, Geocoachers, Search and Rescue personnel, or for someone stashing goodies in the wild somewhere “for later”, this course is also a lot of fun and is very educational. Take from it what you will, and enjoy.
In this course we will learn about using navigation tools and techniques, such as a topographic map and a compass, to successfully negotiate terrain and recognize terrain features, to determine positions on the ground and to be able to accurately communicate that knowledge. Though this course focuses on the Fyrd’s standards for map scale and compatible gear (Such as Scales, Grid methods, and Map resources), these will all be familiar to anyone who has had a military or Emergency service land nav class. We didn’t invent anything here. We will be covering a lot of different gear, all of which we think is helpful and useful, but by no means necessary. One does not need “all of the things” to successfully navigate. The most rudimentary setup can be just a map and compass … and later we will even show you how to get along without those either.
Part 1: Gear
Compass.
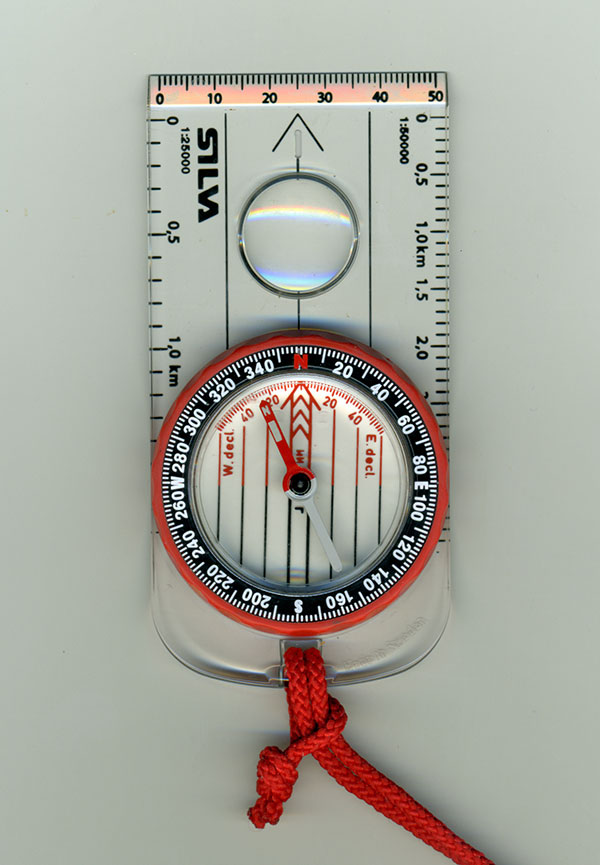
A baseplate type compass made by Silva
Among the most basic instruments for land navigation and orientation is the compass. It is used for navigating terrain, determining magnetic north, and plotting courses. A Magnetic compass is the most basic modern compass type. It has a magnetized needle which aligns itself along the Earth’s magnetic North/South polar Axis when held horizontal. Magnetic compasses that are suitable for use with topographic maps come in many forms. Such forms include the Protractor type Orienteering compasses like the Silva 4B or the Sunnto M-series compasses which have a clear acrylic protractor baseplate and a liquid filled bezel to dampen the needle’s oscillations; or the military M-1950 Lensatic Compass which incorporates a lensatic sighting system and a copper induction dampened, illuminated magnetic dial instead of a single needle.
There are even digital compasses like those on magnetometer equipped smartphones and smart watches which can be quite helpful. Though it is not recommended that you rely on a battery powered device if you anticipate needing to use it for any extended period of time.
Though you are welcome to use whatever good quality compass you wish, As part of it’s standard Kit for navigation, The IrminFyrd recommends the Military M1950 Lensatic Compass. This compass is still in production after it was first introduced right after WW2 and has remained relatively unchanged since. It is the type of compass which will be favored in the remainder of this course.
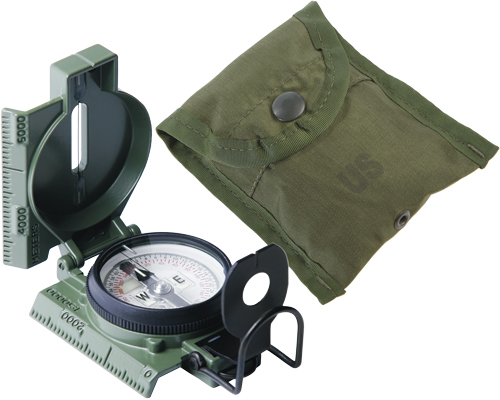
Lensatic Compass with carrying case
The lensatic compass is made exclusively by the Cammenga corporation and comes in two different types: The less expensive version with phosphorescent (glow-in-the-dark) markings that have to be charged from a light source and will glow for several hours, and the 3H Tritium filled version that uses radioactive decay to cause the markings to glow for approximately 12 years continuously. When purchasing a used 3H compass be sure to check the date stamped on the inside of the front cover to see if it’s half-life is up.
Beware of the very inexpensive plastic Chinese knockoffs, they will not perform the same as the genuine oracle will. The plastic copies are filled with Mineral oil to dampen the needle, and once that mineral oil starts to leak out, an air bubble will form, which will render the compass pretty difficult to use, at best. The real Lensatic compass uses a copper induction dampening ring to slow the dial’s rotation without using liquids, a superior, durable design with nothing to go wrong.
The lensatic compass and its parts.
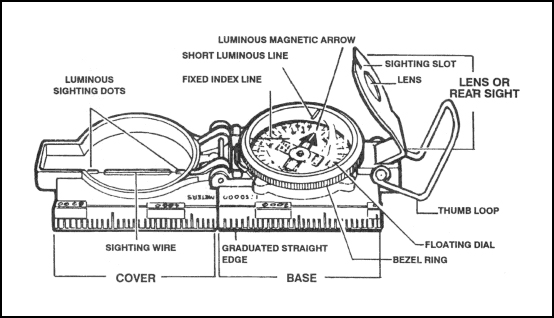
a. Cover. The compass cover protects the floating dial. It contains the sighting wire (front sight) and two luminous sighting slots or dots used for night navigation.
b. Base. The body of the compass contains the following movable parts:
- The floating dial is mounted on a pivot so it can rotate freely when the compass is held level. Printed on the dial in luminous figures are an arrow and the letters E and W. The arrow always points to magnetic north and the letters fall at east (E) 90° and west (W) 270° on the dial. There are two scales; the outer scale (printed in Black) is graduated in 6400 mils and the inner scale (normally in red) is graduated in 360 degrees.
- Encasing the floating dial is a glass containing a fixed black index line.
- The bezel ring is a ratchet device that clicks when turned. It contains 120 clicks when rotated fully; each click is equal to 3°. A short luminous line that is used in conjunction with the north-seeking arrow during navigation is contained in the glass face of the bezel ring.
- The thumb loop is attached to the base of the compass.
- The rule along the side of the base is graduated in 1:50,000 meter scale.
c. Lens. The lens is used to read the dial, and it contains the rear-sight slot used in conjunction with the front for sighting on objects. The rear sight also serves as a lock and clamps the dial when closed for its protection. The rear sight must be opened more than 45° to allow the dial to float freely.
Global Positioning System Receiver.
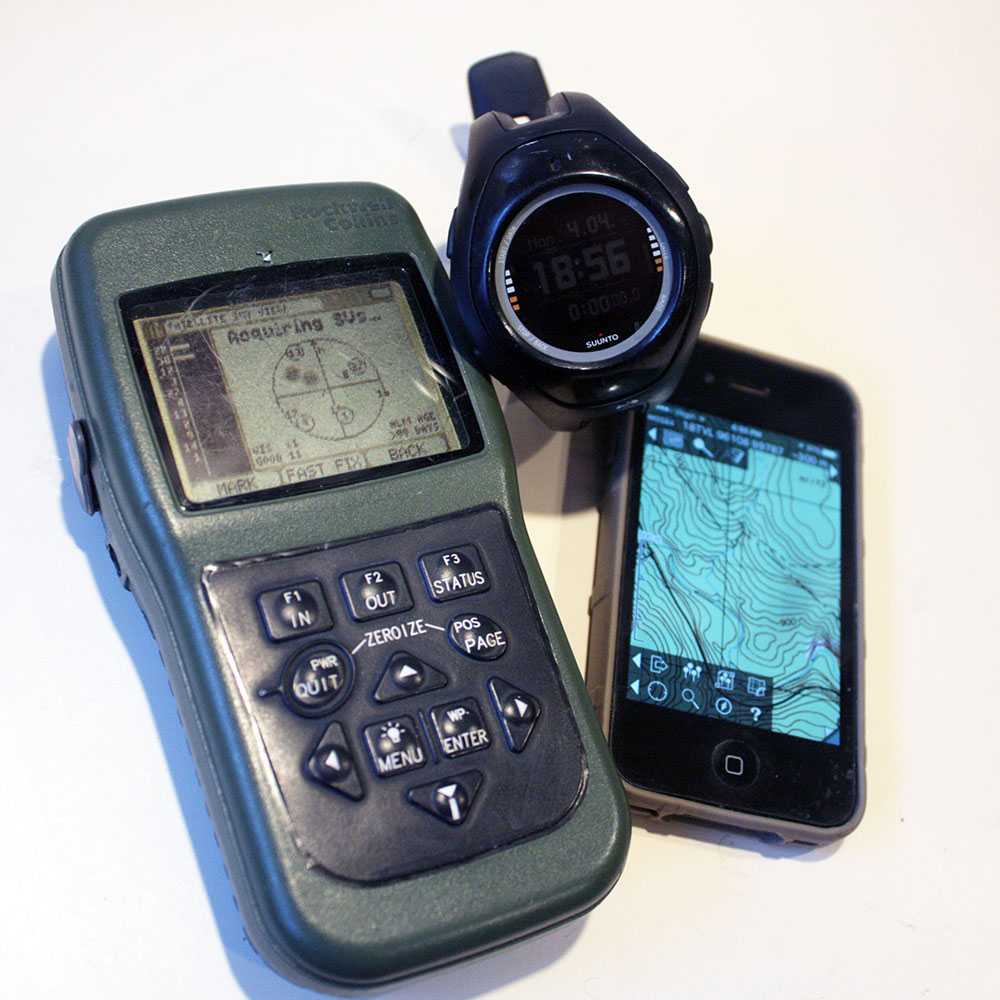
Gadgets like a DAGR, Suunto X10 or smartphone are helpful tools, but they can fail on you.
As previously stated, the heavy reliance on GPS and battery powered navigation gear is discouraged for this course, and the focus is on obtaining land navigation and orientation skills that are not augmented by the aid of software. Devices like the DAGR handheld GPS, Wrist worn GPS units, and Smartphones with GPS apps installed are very handy, accurate and give reliable results. However, they are vulnerable to failure and too much reliance on the computer to “do it for you” will leave you handicapped if the technology fails on you at a critical time. Land nav is a somewhat perishable skill, and without practice will become more difficult to perform unaided. Anybody can navigate successfully if he has all of the tools, this course is tasked with empowering you with the knowledge to do it without the easiest means.
GPS receivers are subject to several possible failures. The most obvious is that the batteries can die at a critical time. It could be that it was packed with fresh batteries, but got turned on in the pack and the batteries will have drained prematurely. It can simply have broken or gotten wet; Gadgets are fragile. GPS receivers are subject to interference from terrain, jamming environments and weather patterns. They require a clear line of sight to the sky to get a good fix (bad for caves, tunnels and canyons). And another worry, though unlikely, is that the entire global GPS system can be “switched off” in the event of a serious enough emergency. The severity of such an event would probably be the most urgent time you would need to be using your backwoods skills the most.
Thus, while it is good to have; Just like it is handy to keep a calculator for doing math calculations; it is necessary to learn how to do the work manually before relying too heavily on the technology.
Pace Count Beads.
Pace count beads are a simple abacus-like counting aid that are extremely handy for keeping track of the distance traveled on complicated multi-leg routs. They can be made easily by adding beads onto a knotted piece of Paracord, or they can be purchased online cheaply.There are 9 beads on one section, and usually about 5 or more on the other section. The beads are used to count the distance walked by moving one bead for every 100 meters walked. The distance is known by pre-determining the user’s pace-count. More on pace count will be covered later on.
Pace count beads are not absolutely necessary to carry, but they are useful. The same technique can be used by picking up a pebble 100 meters or some other counting technique.
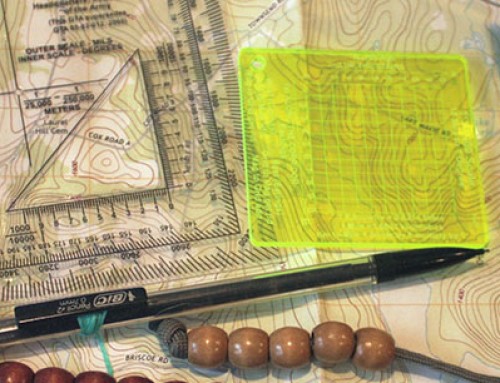
Roamer or coordinate scale.
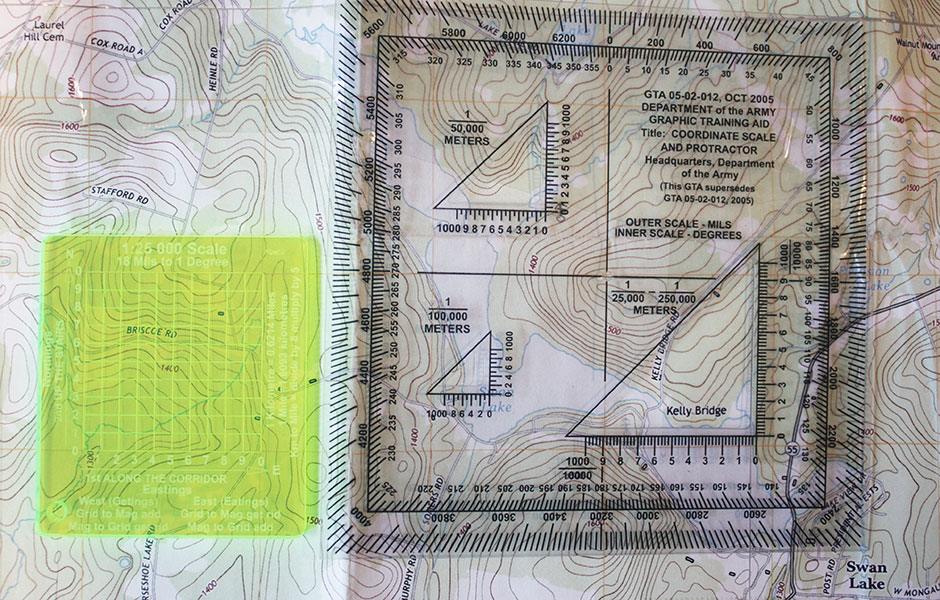
Left: a commercial Map roamer from Ebay. Right, a US Army GTA-05-02-012 coordinate scale and protractor.
A map roamer is a transparent acrylic scale that is divided into a 10×10 grid. It is used to divide a map grid square into 100 meter sections. The roamer is a very helpful tool for plotting courses on a map. Another type of roamer is the Coordinate scale like the GTA-05-02 that the military uses. These and similar devices usually have several map scales represented, and have a protractor graduated in mils and degrees printed around its perimeter. Some baseplate style compasses have a roamer engraved in their bases. Get a roamer for use with a 1:25,000 scale map.
Map bag.
Your maps should be protected in a clear plastic pouch to keep them clean and dry while in the field. Something as simple as a Zip Lock bag works fine, but there are more fancy options available for sale. Everything from back-lit glow in the dark wrist pouches to tethered dry-bags for canoeing. You can decide what best fits your needs. It is best to be able to read the map without having to remove it, and being able to write on the plastic with china pens is a helpful bonus.
Pen/pencil and notepaper.
Have writing tools handy; It is important to be able to record time/azmuth/distance/pace info on complicated multi-leg trips. A .5mm mechanical pencil is ideal for annotating maps, plotting azmuths, recording GPS data and such. Its consistent width allows for drawing more accurate lines on the map. When a waterproof pen may be needed to mark waterproof paper and maps, a fisher space pen is proven for this. Waterproof note paper can be purchased (such as the brand “rite in the rain”) or made. To make waterproof cards, treat 3×5 index cards with Thompson’s water sealer.
Route measuring scale.
This is simply a 12″ piece of waxy dental floss marked at 1 kilometer intervals (as per your map’s scale) which comes in handy for quickly measuring irregular routes in the field. It can be tied and wrapped around the pencil when not in use.
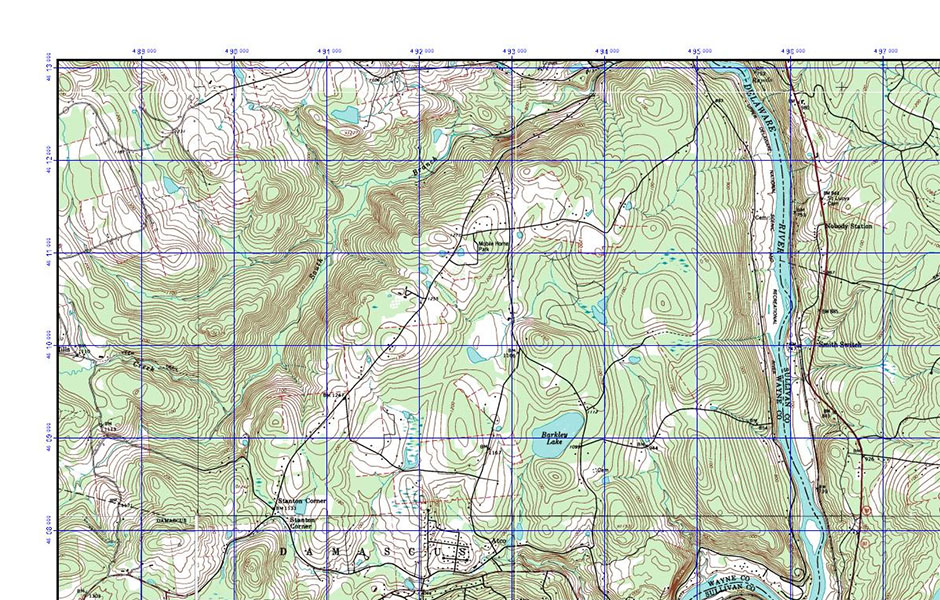
Maps.
A map is a graphical representation of a portion of the earth’s surface drawn to scale in a top-down projection. Topographic maps portray terrain relief in a measurable way by using contour lines in conjunction with the horizontal positions of the features represented. US Topographic maps are produced by the USGS and can be obtained for free via their website as a downloadable .pdf. The best-known topographic series is the 7.5-minute or 1:24,000 quadrangle. This scale is unique to the United States and is inconsistent with almost all map tools available outside the US. Even the US Military uses metric scales. Thus, when downloading USGS quads for use with metric map tools, the 1:24,000 scale map needs to be printed at 96% scale to represent 1:25,000 scale. You can print the quad at home on letter size paper with crop marks, trim the edges, and tape the 9 pieces together. Or you can have a place that does wide format printing do it for you. Just remember 96%. All Military and international map tools will work correctly then. Remember to edit the scale information in the legend.
 USGS Quads can be obtained online here. It is recommended that you download all of the map quads for your area, and the areas you care about and store them with a .pdf viewer on a thumb drive. This way you can access them without need for internet.
You can also order topographic maps printed on waterproof paper commercially. Mytopo.com is one such company. Be sure to get 1;25000 scale map with UTM/MGRS gridlines and use the 1984 datum. we’ll explain what all that means later on.